> ## Documentation Index
> Fetch the complete documentation index at: https://docs.hologram.io/llms.txt
> Use this file to discover all available pages before exploring further.
# Activate SIMs in the Hologram Dashboard
Activating SIM cards is easy with Hologram. Whether you are activating one or one thousand devices, you can quickly activate SIM cards in your [dashboard](https://dashboard.hologram.io/account/login) using this step-by-step guide.
## How activation works in your dashboard
During the activation process, you will select a data plan for your new SIMs, review coverage and rates, set data usage limit preferences, organize your SIMs with tags or name prefixes, then finally pay and activate the SIMs so that they can connect for the first time.
If you are activating SIMs for the first time, please note that you'll need to add **payment details and a billing address** to complete the activation process. [Learn more about adding a billing address](/dashboard/billing/billing-account-overview).
**Limited access:** Learn more about Test Mode and streamline your deployments by contacting our [sales team](https://www.hologram.io/contact-sales?utm_source=docs\&utm_medium=website\&utm_content=test_mode_callout).
You can navigate away from and return to the activation process at any time without losing your progress. Your progress is saved until you log out.
### Step 1 – Add SIMs to activate
First, enter the ICCIDs of the SIMs you want to activate. You can add SIMs individually, by entering a range, or by list upload using a CSV file. You can enter ICCIDs or EIDs when activating SIMs. Read about [how to find SIM ICCIDs](/guides/troubleshooting/how-to-find-sim-iccids-and-eids)
#### Enter SIMs individually by ICCID
Enter an ICCID by typing or copy/paste. You can add multiple ICCIDs separated by a comma, space, or line break. Barcode scanners can help quickly enter ICCIDs using the bardcode printed on each SIM card.
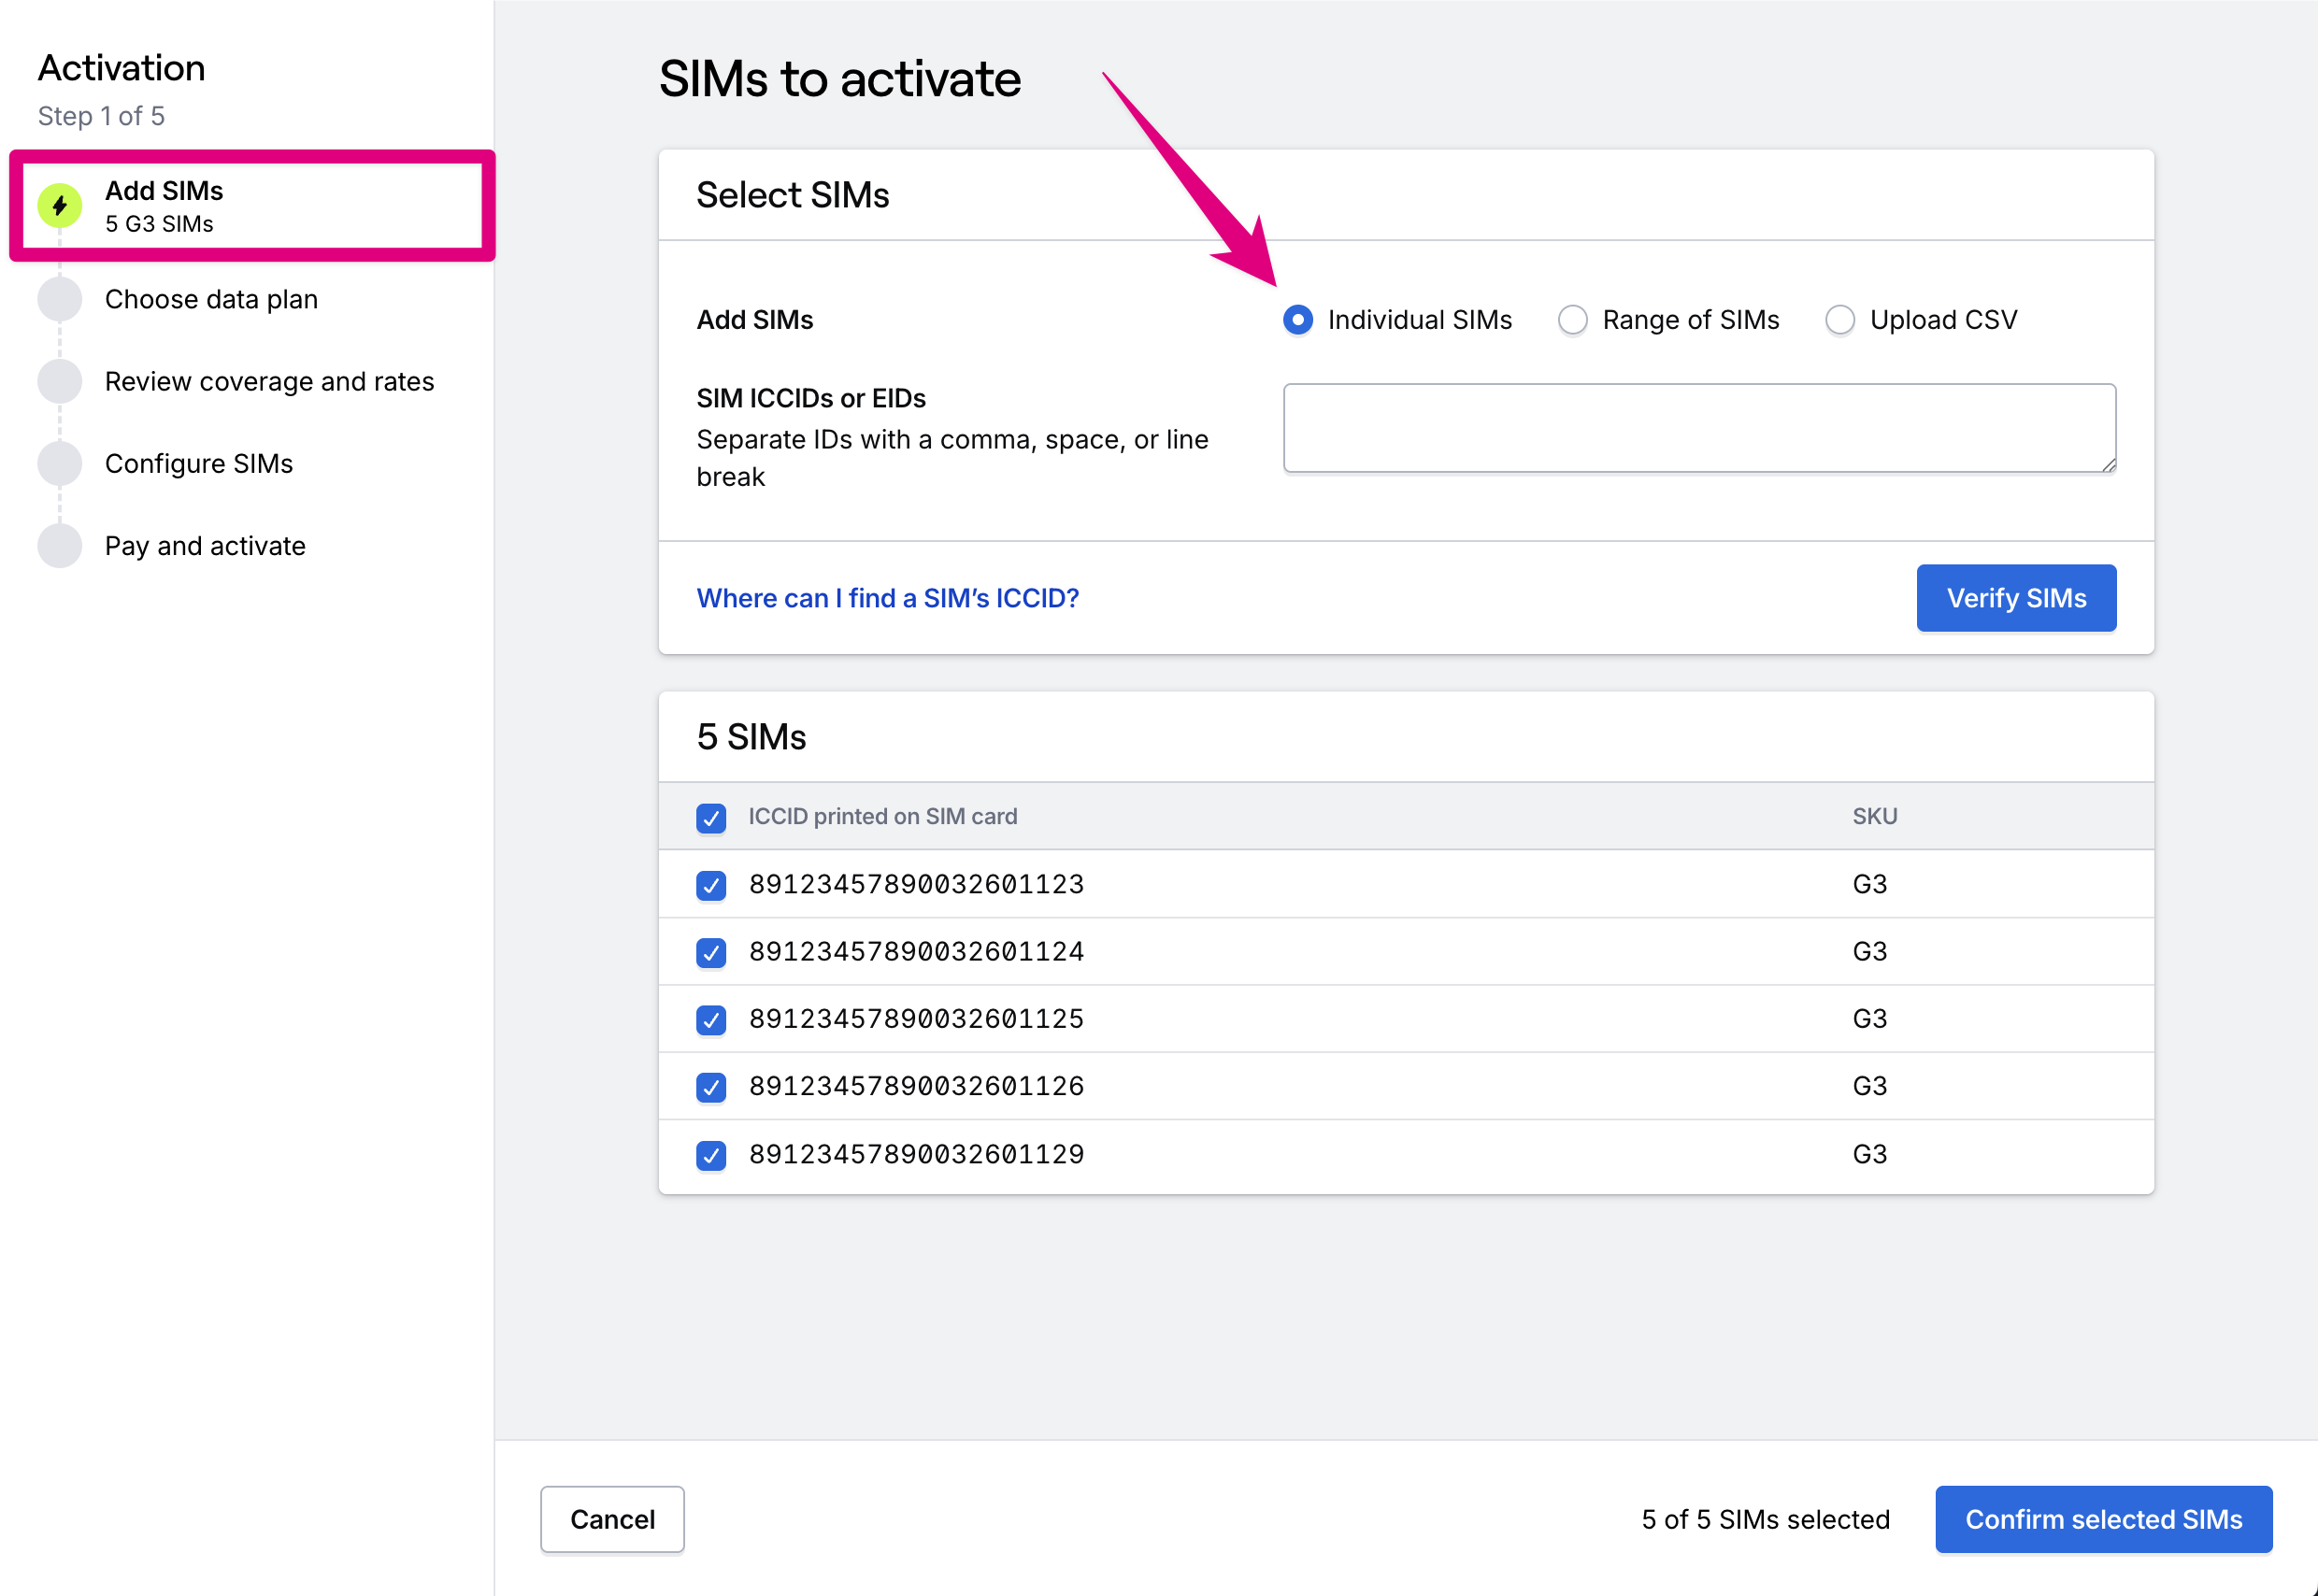 #### Enter a range of SIMs
To choose a range of SIMs, enter the first and last ICCIDs in the range of SIMs to activate. You can find these ICCIDs printed on the box of SIMs you receive as the “ICCID Start” and “ICCID End”.
#### Upload a CSV
You can add a list of SIMs by uploading a list of ICCIDs in a `CSV` file using the template linked on the page. Click the **Download this template** link to download the CSV template, or use the format shown below this step.
#### Enter a range of SIMs
To choose a range of SIMs, enter the first and last ICCIDs in the range of SIMs to activate. You can find these ICCIDs printed on the box of SIMs you receive as the “ICCID Start” and “ICCID End”.
#### Upload a CSV
You can add a list of SIMs by uploading a list of ICCIDs in a `CSV` file using the template linked on the page. Click the **Download this template** link to download the CSV template, or use the format shown below this step.
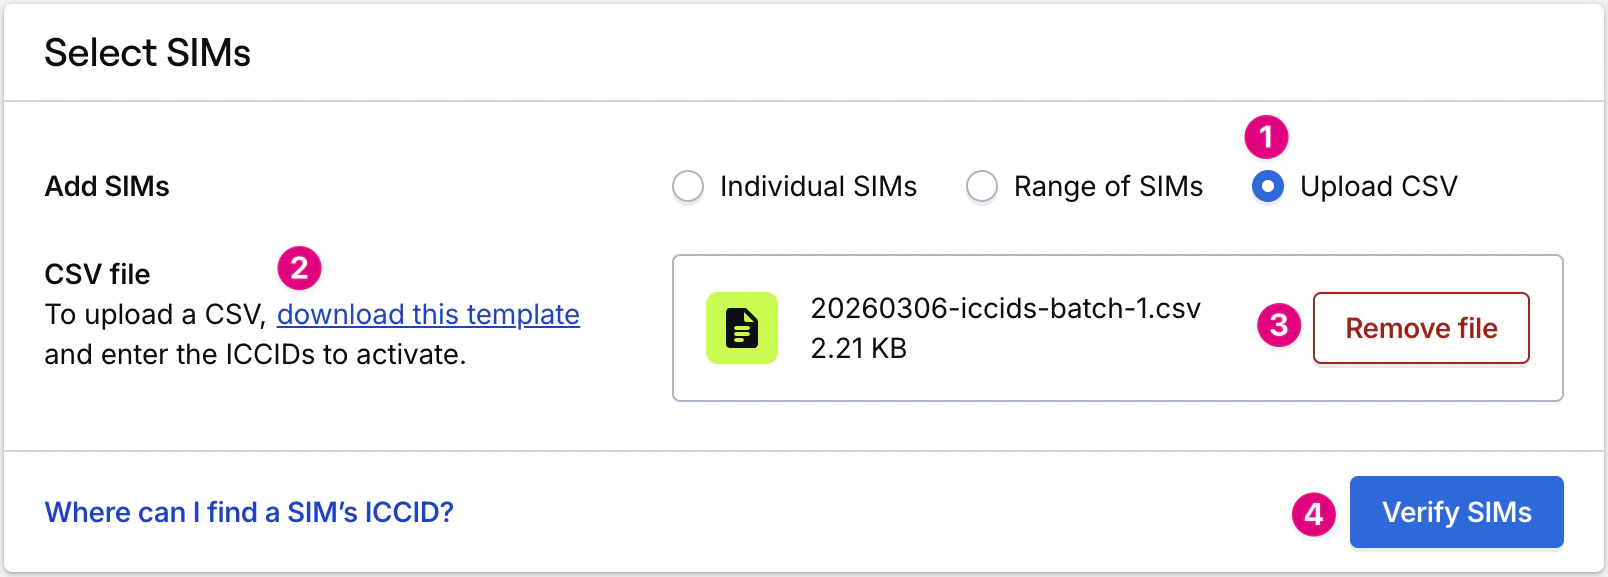 ##### CSV template format
```csv theme={null}
ICCID
YOUR_ICCID_1234567890
YOUR_ICCID_1234567891
YOUR_ICCID_1234567892
```
Once the ICCIDs are successfully verified, you will see the ICCIDs displayed in a table along with the profiles installed on the SIM, which determines the coverage and data plans available to the SIM. If there are any errors when verifying an ICCID, you will see a red or yellow notification callout with an explanation.
### Step 2 – Select coverage and rates
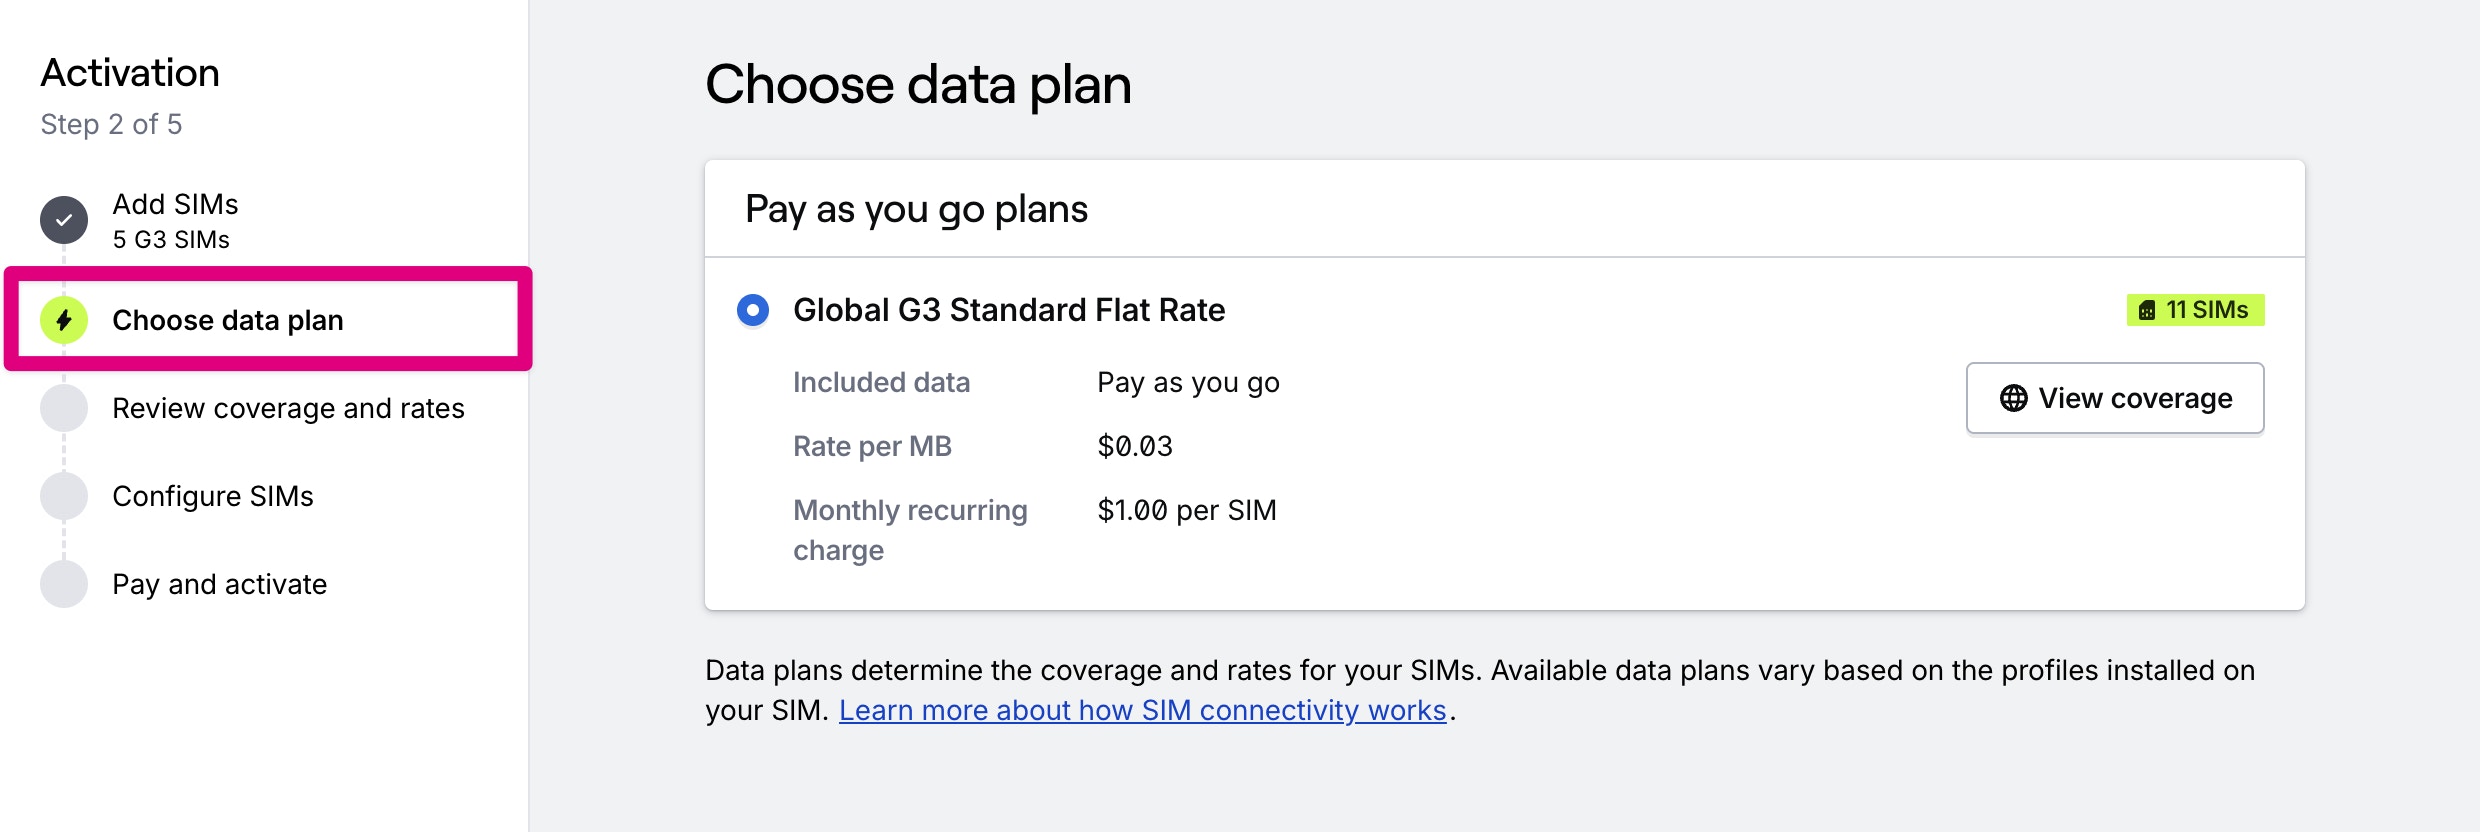
After entering SIMs, you can choose from data plans available to those SIMs. Data plans define the **coverage** and **pricing** available to a SIM, based on its installed connectivity profile(s).
##### CSV template format
```csv theme={null}
ICCID
YOUR_ICCID_1234567890
YOUR_ICCID_1234567891
YOUR_ICCID_1234567892
```
Once the ICCIDs are successfully verified, you will see the ICCIDs displayed in a table along with the profiles installed on the SIM, which determines the coverage and data plans available to the SIM. If there are any errors when verifying an ICCID, you will see a red or yellow notification callout with an explanation.
### Step 2 – Select coverage and rates
After entering SIMs, you can choose from data plans available to those SIMs. Data plans define the **coverage** and **pricing** available to a SIM, based on its installed connectivity profile(s).
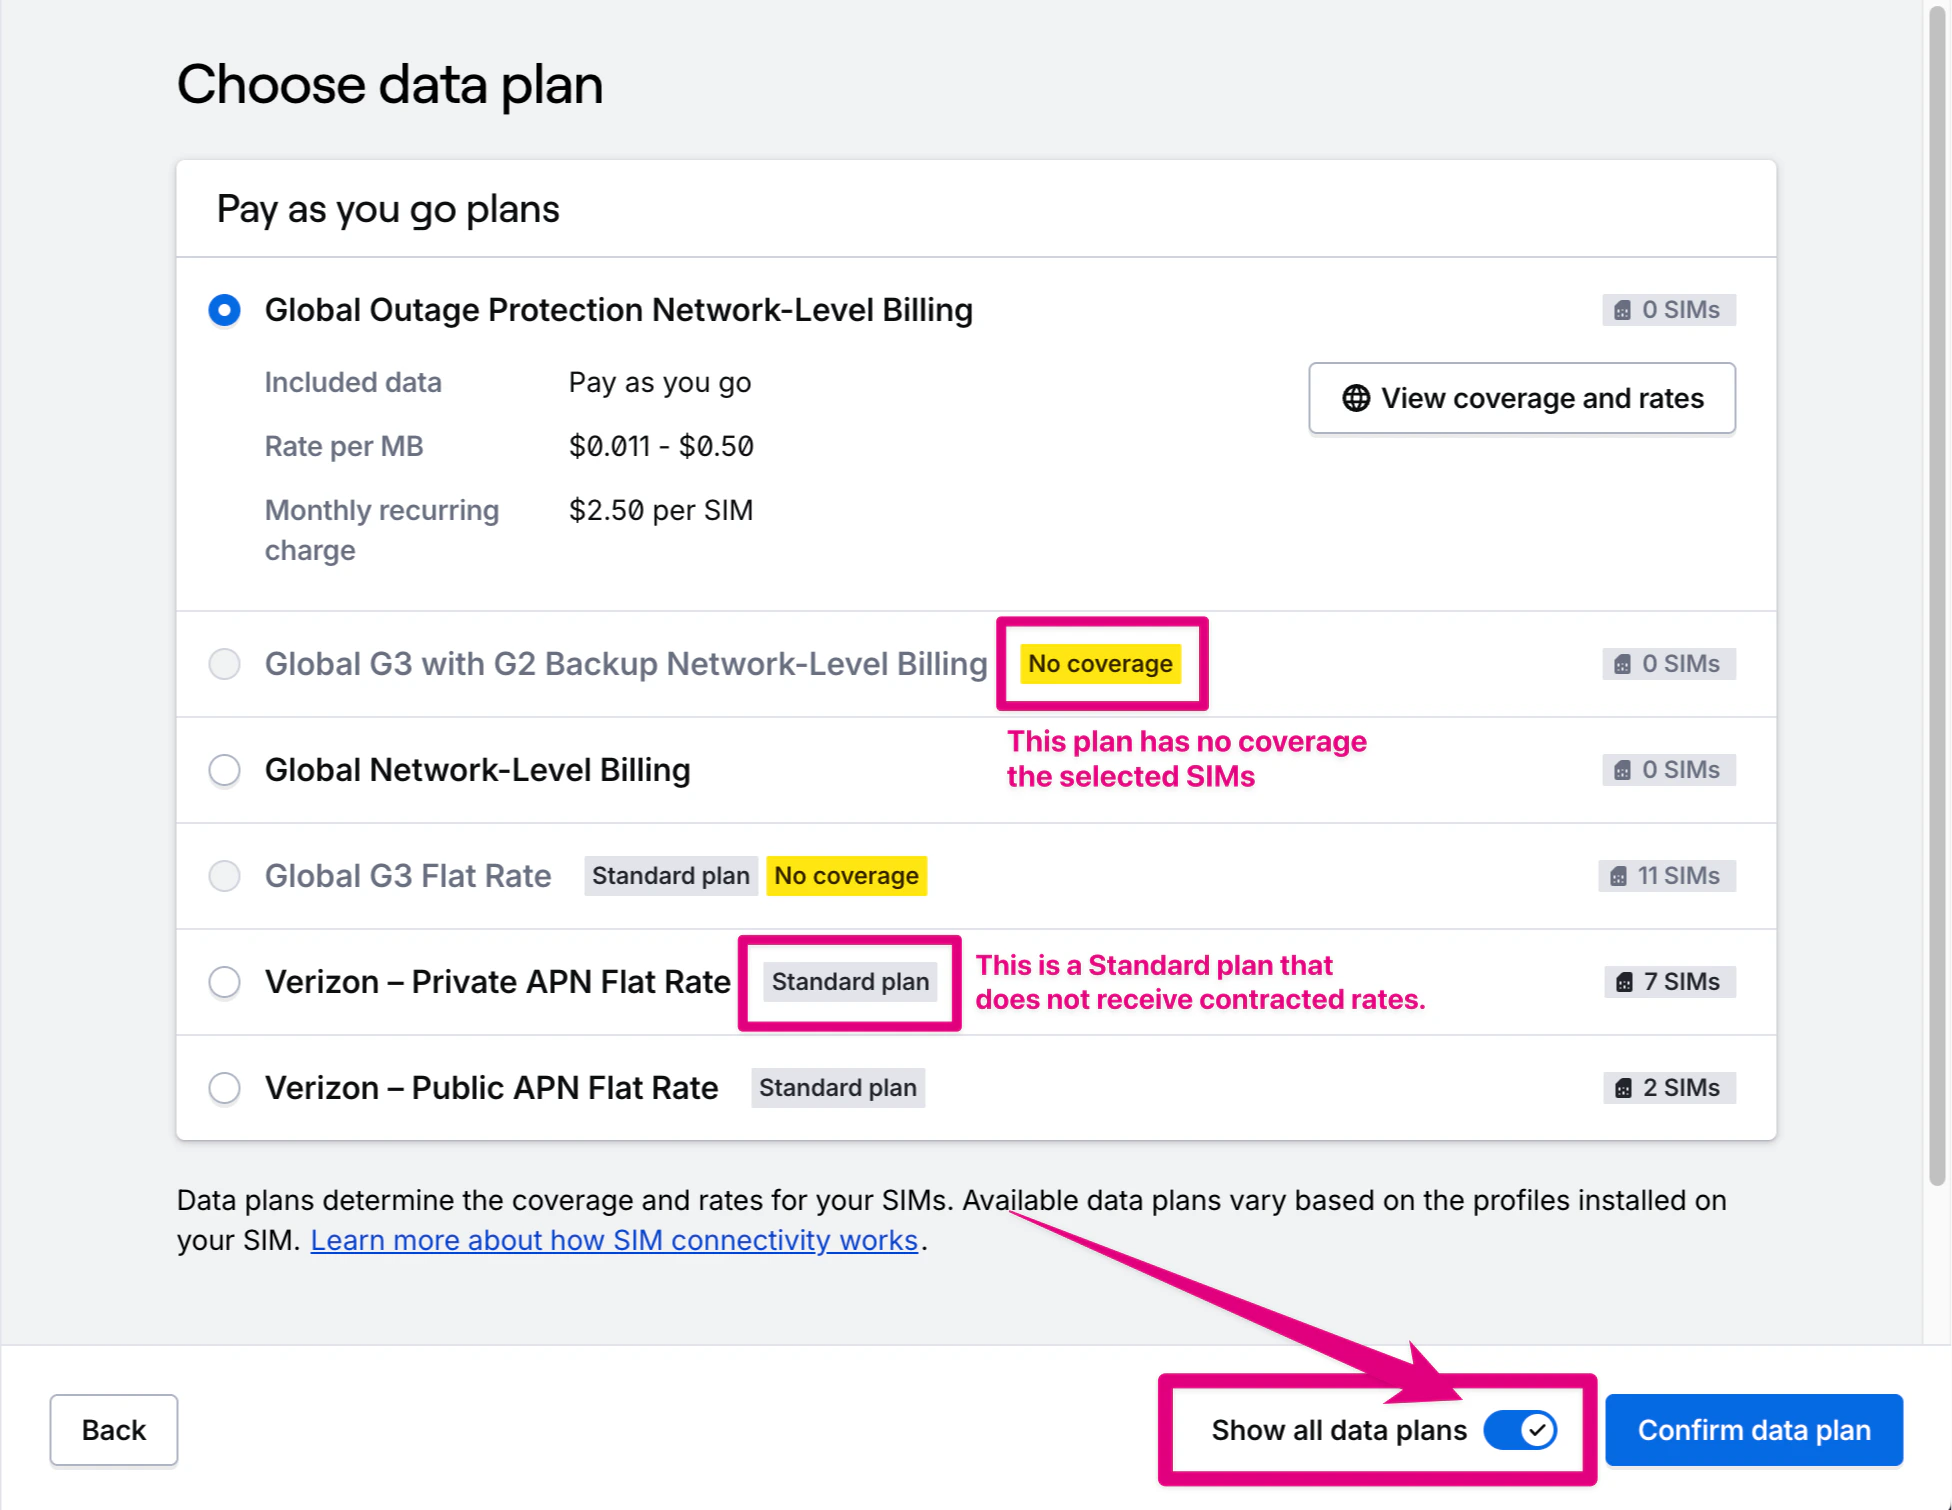
 The page only shows data plans that have coverage or favorable rates for the SIMs you have entered. However, you can **display all data plans** available to your account by toggling off the **Show only recommended plans** switch at the bottom of the page. If you have contracted rates available to your organization this reads **Show all data plans**.
Any data plans without coverage or negotiated rates for the SIMs you've selected are marked in the list.
The page only shows data plans that have coverage or favorable rates for the SIMs you have entered. However, you can **display all data plans** available to your account by toggling off the **Show only recommended plans** switch at the bottom of the page. If you have contracted rates available to your organization this reads **Show all data plans**.
Any data plans without coverage or negotiated rates for the SIMs you've selected are marked in the list.
 ### Step 3 – Review coverage and rates
Next, you'll review all of the rates and coverage details for the data plan you've selected.
### Step 3 – Review coverage and rates
Next, you'll review all of the rates and coverage details for the data plan you've selected.
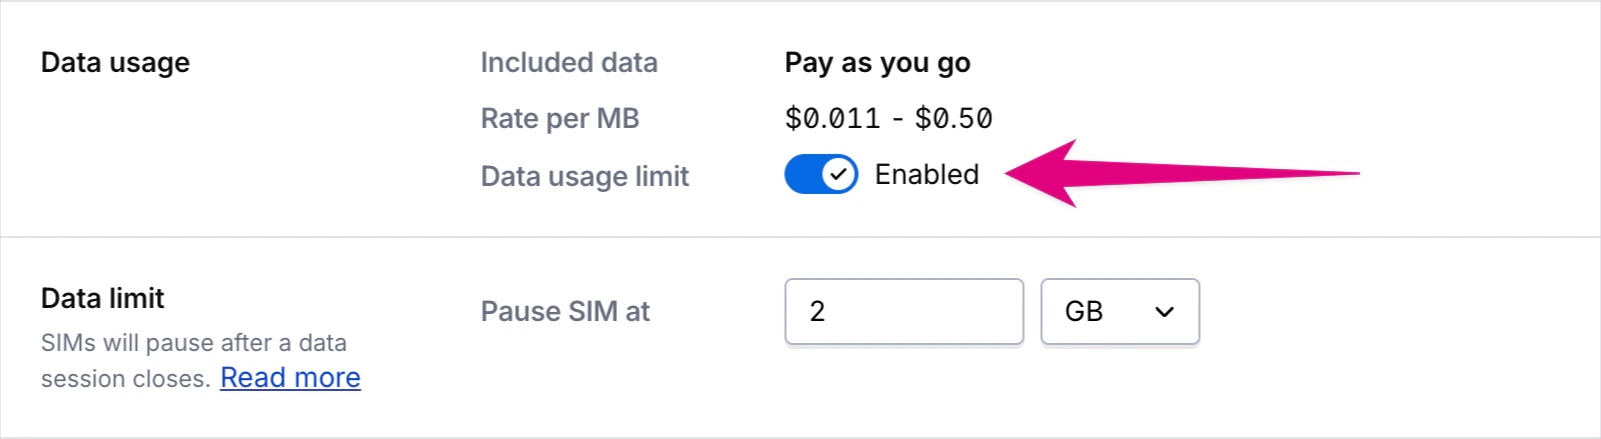
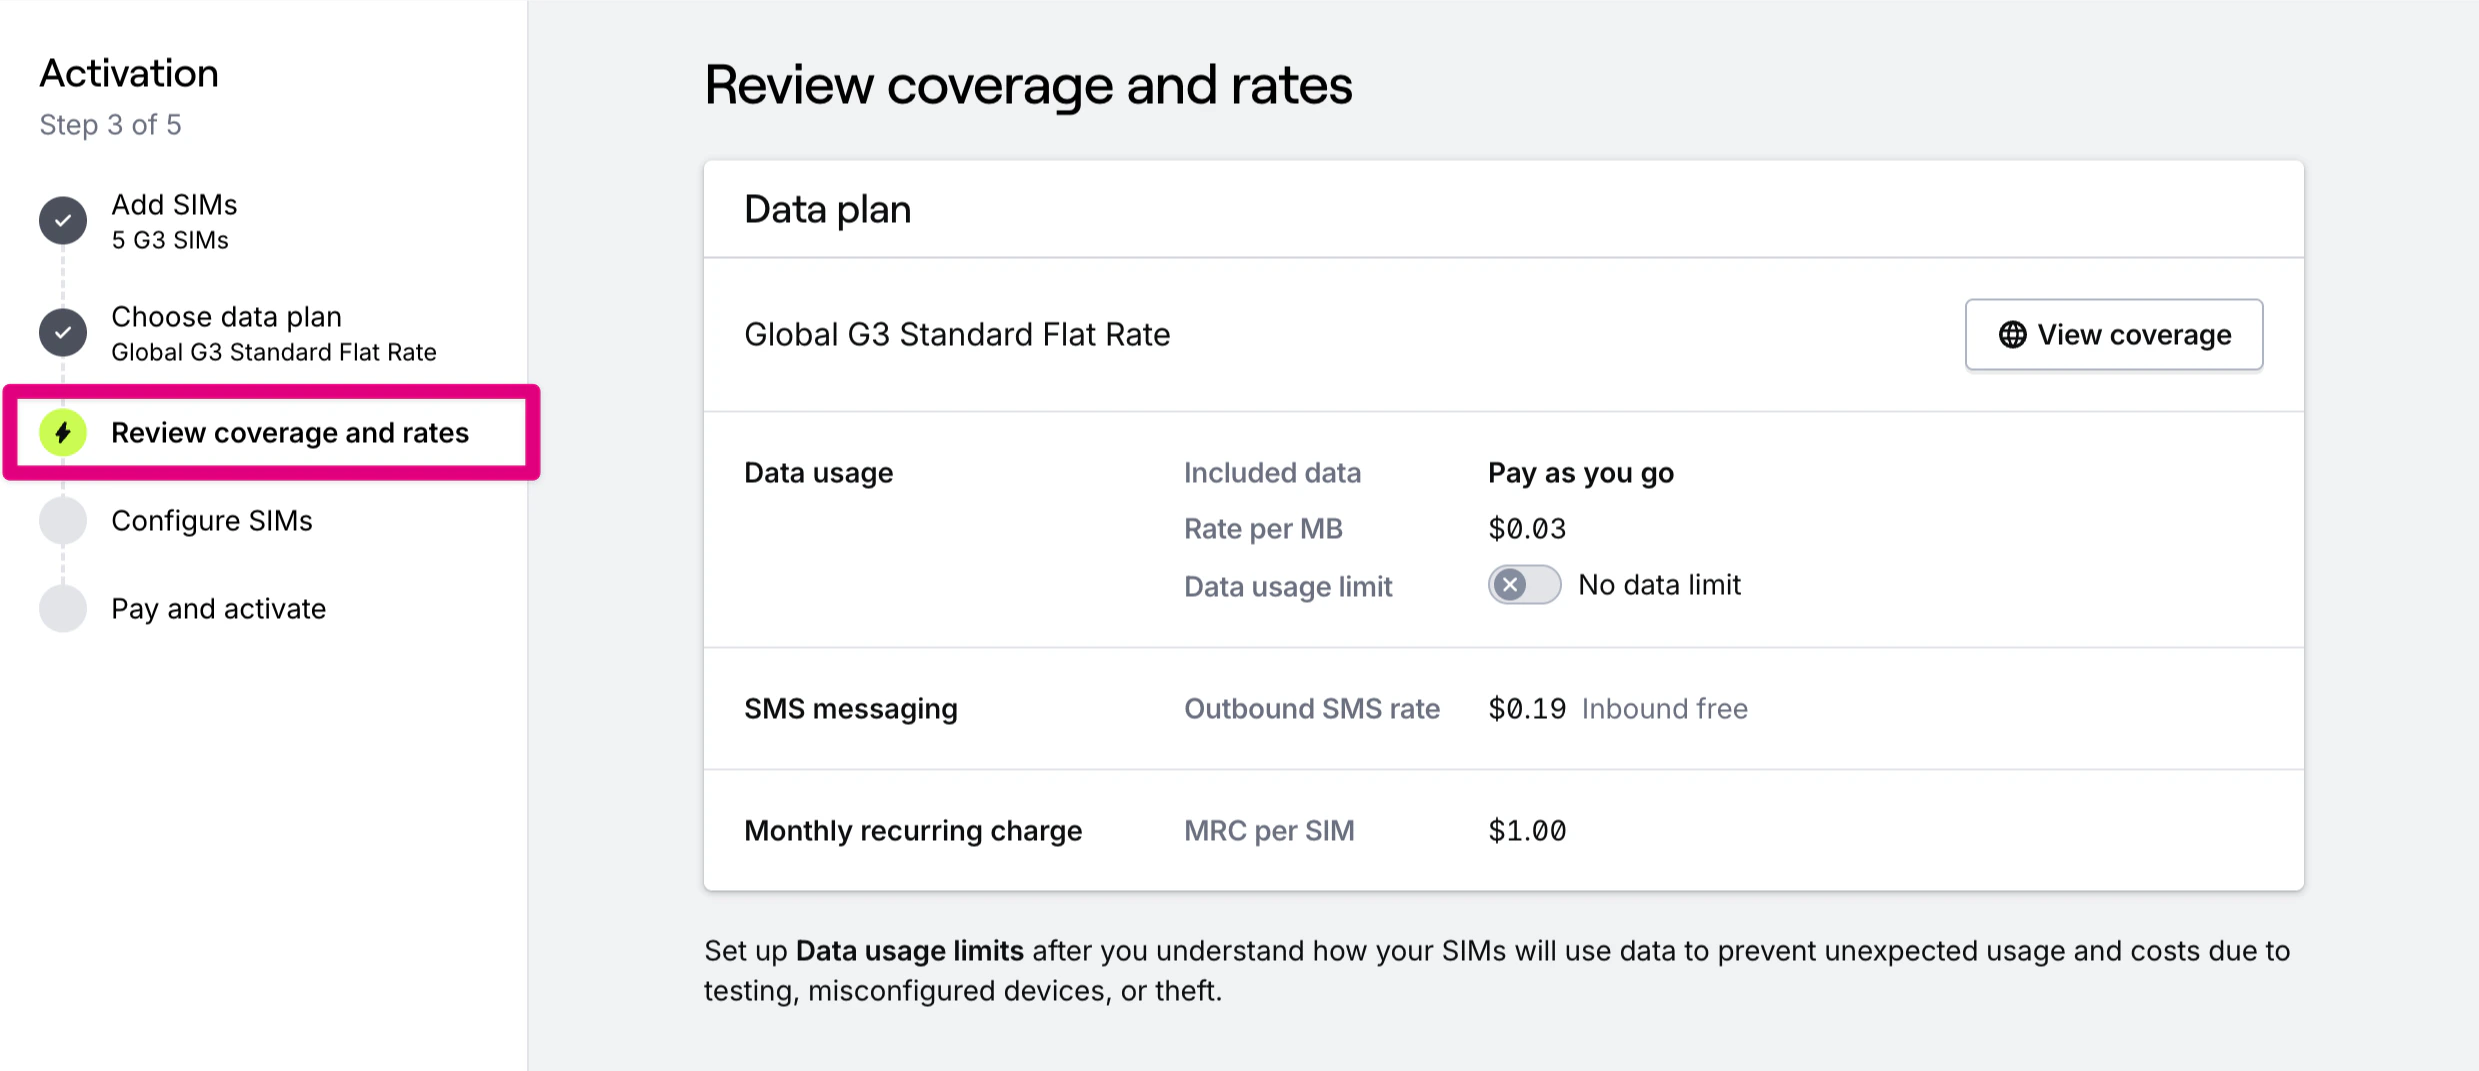 *Optional.* Here you can also set **data usage limits** to pause SIMs automatically if they use over a certain amount of data to help avoid unexpected usage or charges. SIMs can use unlimited data without a data limit set. Read more about [data usage limits](/guides/billing/manage-fleet-data-usage).
 {/* *Optional.* You can also set a **data usage threshold** to monitor when a SIM reaches a certain amount of data usage. This can help identify SIMs that are using more data than expected before they reach a data limit. Note that usage thresholds currently *do not support alerting or notifications*. */}
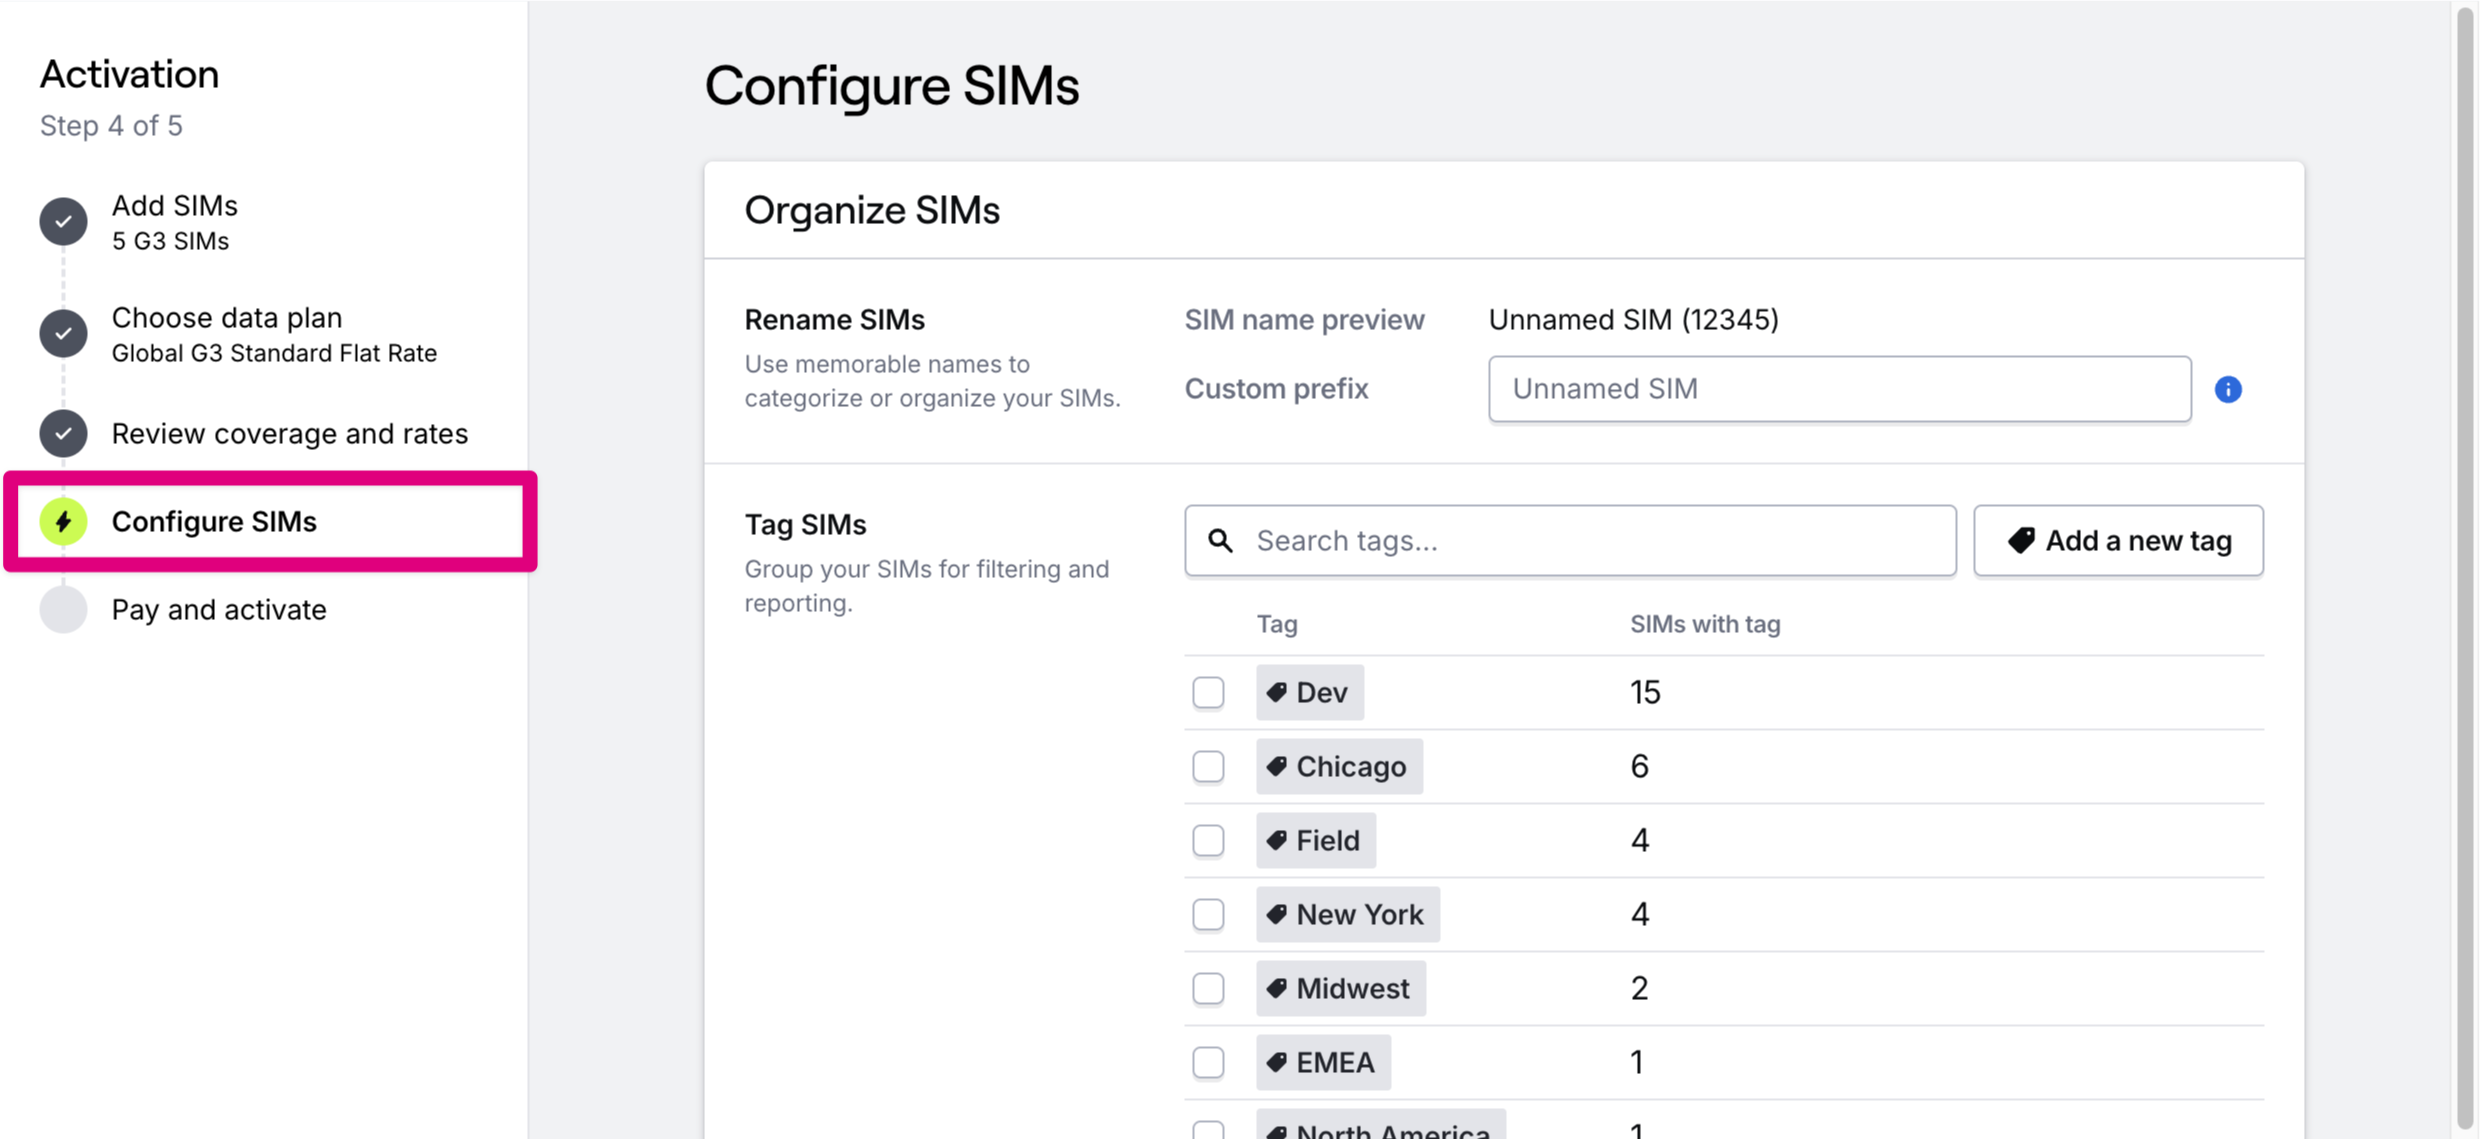
### Step 4 – Organize SIMs with name prefixes and tags
*Optional.* In this step you can **rename** your SIMs using a custom prefix, or add **tags** to help you better manage and organize your fleet. Tags are an especially useful way to organize and report on your fleet, and are useful to get notified of events for specific groups of SIMs when creating alerts.
{/* *Optional.* You can also set a **data usage threshold** to monitor when a SIM reaches a certain amount of data usage. This can help identify SIMs that are using more data than expected before they reach a data limit. Note that usage thresholds currently *do not support alerting or notifications*. */}
### Step 4 – Organize SIMs with name prefixes and tags
*Optional.* In this step you can **rename** your SIMs using a custom prefix, or add **tags** to help you better manage and organize your fleet. Tags are an especially useful way to organize and report on your fleet, and are useful to get notified of events for specific groups of SIMs when creating alerts.
 ### Step 5 – Review and activate
You're almost there!
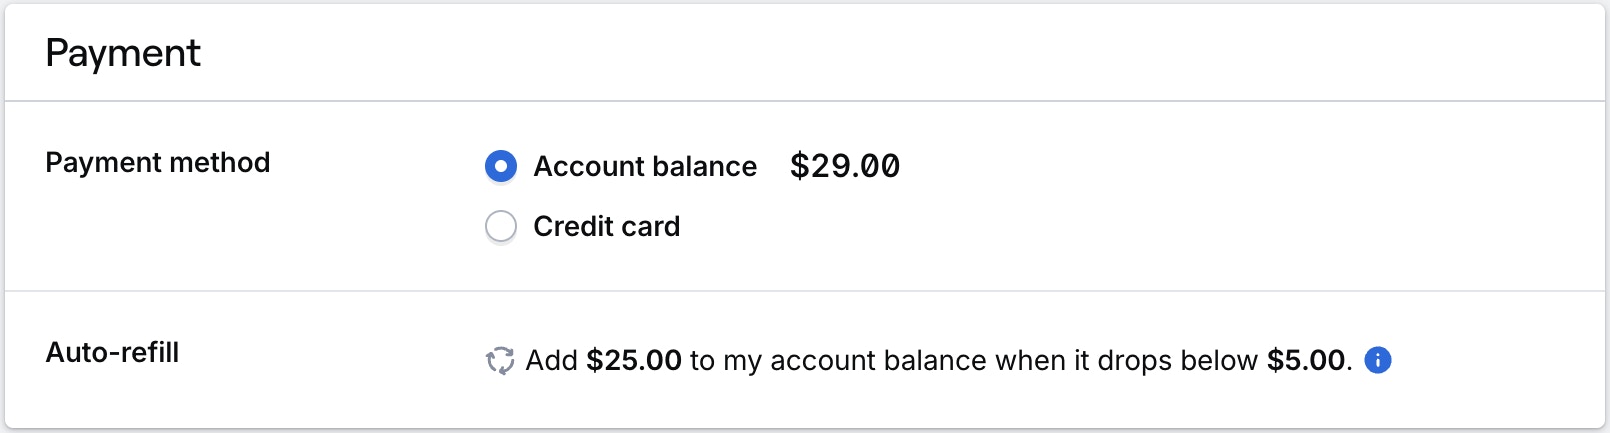
In the final step, you have the chance to review all the selections you have made so far, confirm payment information and activate your device.
### Step 5 – Review and activate
You're almost there!
In the final step, you have the chance to review all the selections you have made so far, confirm payment information and activate your device.
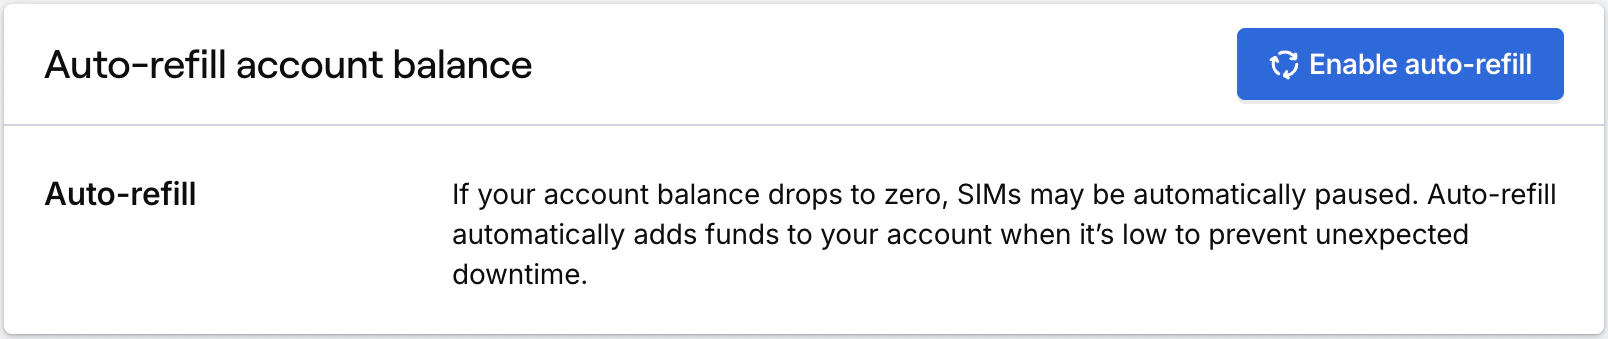
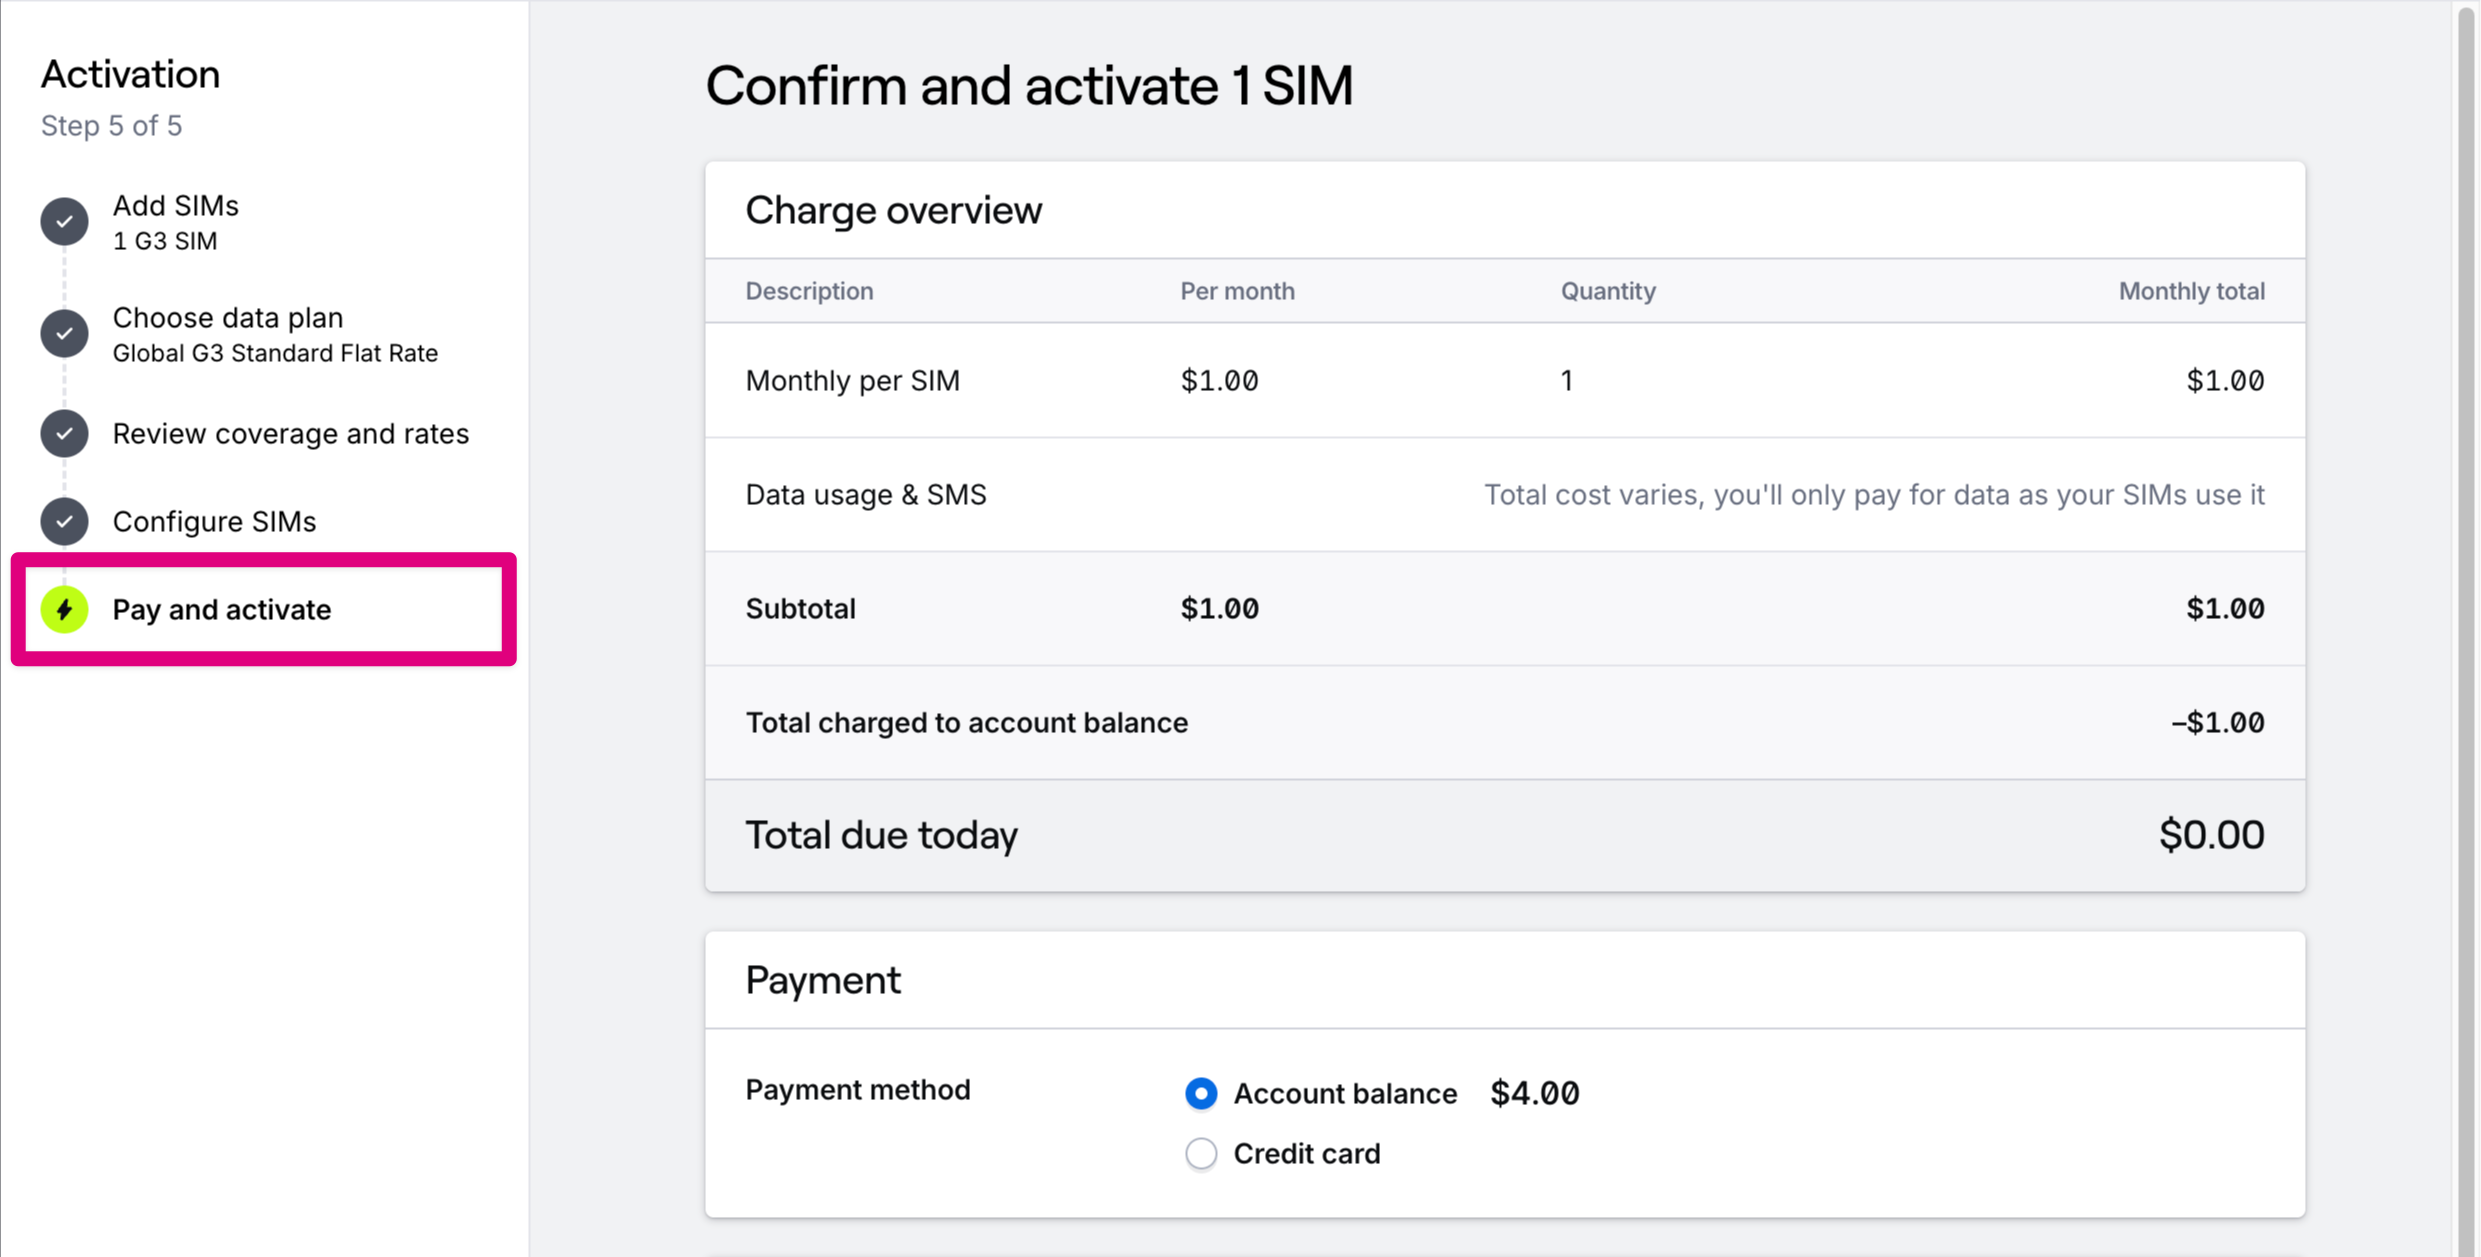 If your account is prepaid and draws down from an account balance, you can set up account auto-refill to ensure that your devices never go offline due to insufficient funds. Read more about [auto-refill](/guides/billing/auto-refill).
 ### Step 6 – Set the APN for your device
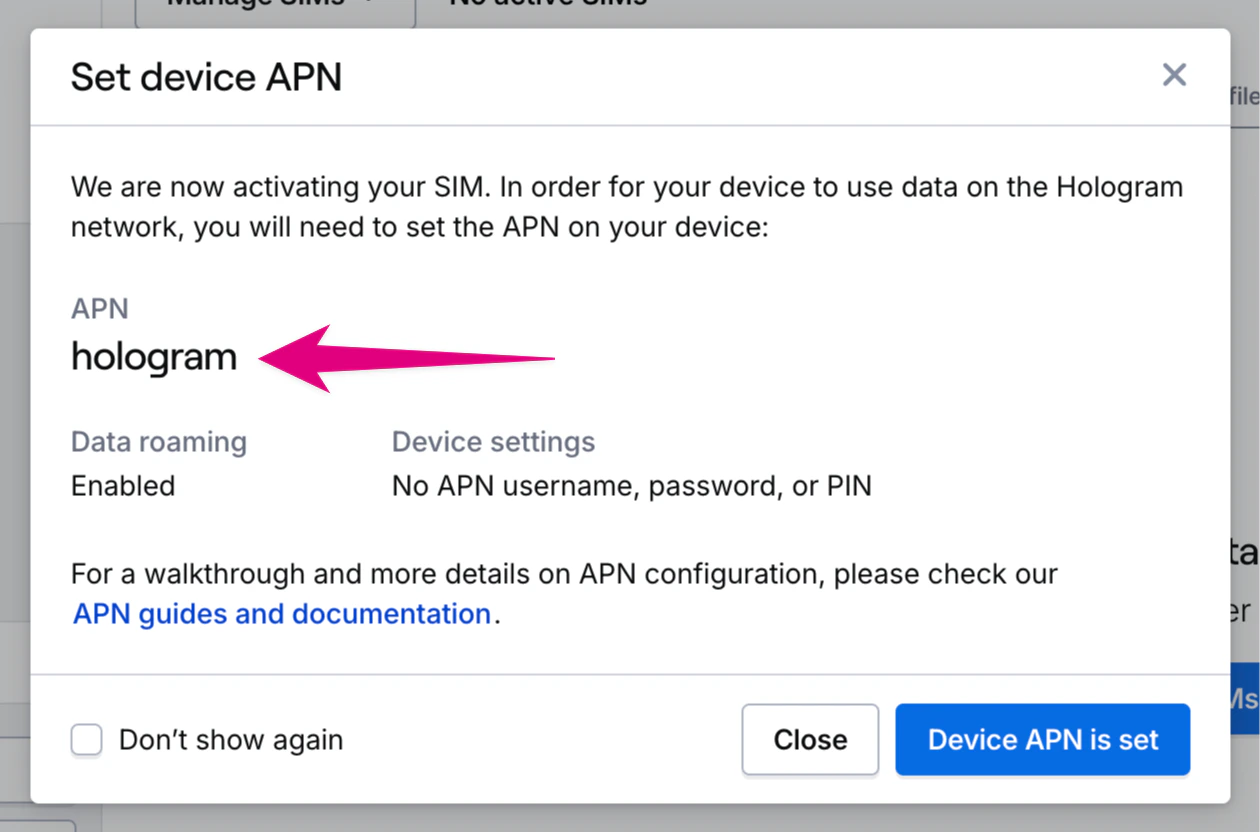
Once you click **Pay and activate**, you will see a final confirmation screen with a reminder to set the APN for your device before you are taken back to your dashboard. Read more about [setting the APN for your device](/guides/get-started/set-the-device-apn).
### Step 6 – Set the APN for your device
Once you click **Pay and activate**, you will see a final confirmation screen with a reminder to set the APN for your device before you are taken back to your dashboard. Read more about [setting the APN for your device](/guides/get-started/set-the-device-apn).
 ## Activating SIMs out of Test Mode
SIMs in Test Mode will automatically activate after their free testing period ends with **no downtime or action required** on your part. [Learn more about Test Mode](/guides/sims/test-mode).
If your devices have limited connectivity windows or other constraints, you can [force activate](/dashboard/sim-actions/force-activate-from-test-mode) them out of Test Mode. This can also be used to activate SIMs with legacy Global-1 (G1) profiles, which experience a brief disconnection when activating to update profile states.
## Related guides
## Activating SIMs using the REST API
Activate SIMs (bulk)
## Activating SIMs out of Test Mode
SIMs in Test Mode will automatically activate after their free testing period ends with **no downtime or action required** on your part. [Learn more about Test Mode](/guides/sims/test-mode).
If your devices have limited connectivity windows or other constraints, you can [force activate](/dashboard/sim-actions/force-activate-from-test-mode) them out of Test Mode. This can also be used to activate SIMs with legacy Global-1 (G1) profiles, which experience a brief disconnection when activating to update profile states.
## Related guides
## Activating SIMs using the REST API
Activate SIMs (bulk) POST /links/cellular/bulkclaim
## Related actions
Force-activate SIMs that are in Test Mode
Configure per-SIM data and SMS limits